Are you still splitting shared expenses manually every month? There is a smarter way to manage expense allocation in Microsoft Dynamics 365 Business Central.
Imagine your company receives an office rent invoice of ₹100,000. The expense needs to be distributed across the Administration, Sales, and Finance departments.
Without an automated allocation process, an accountant may need to calculate each department's share and create multiple journal lines manually.
Now imagine doing the same thing every month—not just for rent, but also for electricity, internet, insurance, salaries, maintenance, and other shared expenses.
This repetitive process can consume accounting time and increase the risk of incorrect allocations.
That's where Allocation Accounts in Business Central can help.
In this guide, we'll explain what Allocation Accounts are, why businesses use them, and how to create an Allocation Account in Microsoft Dynamics 365 Business Central.
What Are Allocation Accounts in Business Central?
Allocation Accounts in Microsoft Dynamics 365 Business Central allow businesses to define how an amount should be distributed across multiple accounts or dimensions using predefined allocation rules.
Instead of manually calculating and entering multiple journal lines for every shared expense, users can set up an allocation structure and use it when recording transactions.
For example, an organization may define an allocation rule where:
- Administration receives 40%
- Sales receives 35%
- Finance receives 25%
When the allocation is applied to a ₹100,000 expense, the amount can be distributed according to the predefined percentages.
What Can Expense Allocation Help Businesses Achieve?
A structured allocation process can help organizations:
- Reduce repetitive manual calculations
- Improve posting consistency
- Standardize expense allocation
- Reduce accounting errors
- Save time during month-end closing
- Improve departmental expense visibility
- Simplify recurring shared-cost allocation
Why Do Businesses Need Allocation Accounts?
Many businesses incur expenses that benefit multiple departments, locations, projects, or cost centres.
If these expenses are posted entirely to one account or department, management may not get an accurate view of the actual cost incurred by each business area.
Common examples include:
- Office Rent - One office may be shared by Administration, Sales, Finance, HR, and other departments.
- Electricity Expenses - Shared electricity costs may need to be distributed across multiple departments or locations.
- Internet and Communication Charges - Internet and communication services may be used across the entire organization.
- Insurance Expenses - An insurance policy may cover multiple locations, departments, assets, or business units.
- Other Shared Expenses
Allocation rules can also be useful for recurring shared costs such as maintenance, security, facility management, and other common operating expenses.
Instead of manually splitting these expenses every month, businesses can establish an allocation structure and use it consistently.
How Do Allocation Accounts Eliminate Manual Expense Splitting?
The basic concept is simple:
Create an Allocation Account → Define the allocation rules → Apply the allocation when posting the transaction
For example, suppose an organization wants to distribute a ₹100,000 office rent expense across three departments.
DepartmentAllocation
- Administration40%
- Sales35%
- Finance25%
- Total100%
The resulting allocation would be:
- Administration: ₹40,000
- Sales: ₹35,000
- Finance: ₹25,000
Instead of manually calculating these values every month, the predefined allocation structure can be used to standardize the distribution.
This is particularly useful for organizations that process similar shared expenses on a recurring basis.
How to Create an Allocation Account in Business Central
The following steps explain how to create an Allocation Account in Microsoft Dynamics 365 Business Central.
Before creating the allocation, determine:
- Which G/L accounts or dimensions should receive the expense
- How the expense should be distributed
- Whether allocation should be based on percentages or another applicable method
- Which departments, cost centres, locations, or other dimensions should be used
Step 1 — Search for Allocation Accounts
Start by opening the Tell Me search in Business Central.
Navigation:
Alt + Q → Search "Allocation Accounts"
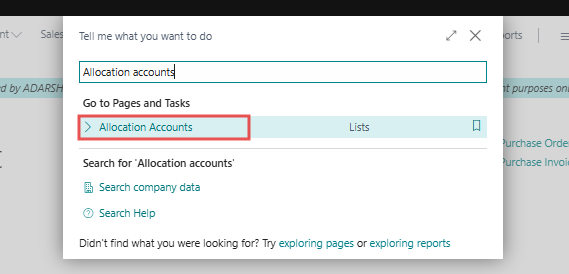
Select Allocation Accounts from the search results.
Business Central will open the Allocation Accounts List page.
Step 2 — Create a New Allocation Account
On the Allocation Accounts List page, select New.
Business Central will open a new Allocation Account Card.
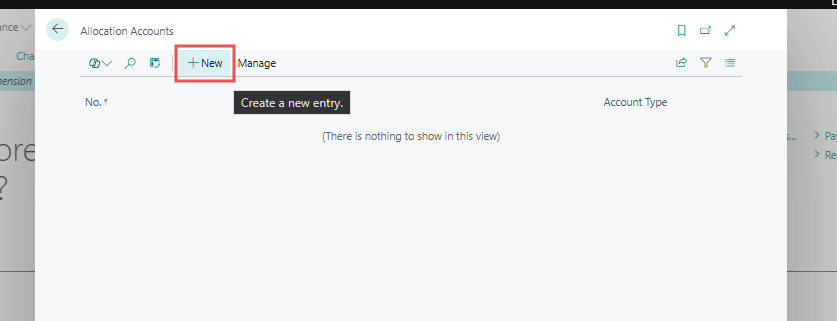
This card is used to define the allocation setup that will be used for distributing the expense.
Step 3 — Enter Allocation Account Details
Enter the required information in the Allocation Account header.
Details to Enter
Code:
Enter a unique code for the allocation account.
Example: RENT001
Name / Description:
Enter a clear description that explains the purpose of the allocation.
Example: Monthly Rent Allocation
Account Type:
Select the relevant account type if applicable to your Business Central configuration.

Use a naming convention that makes the allocation easy for finance users to identify later.
For example:
- RENT001 — Monthly Rent Allocation
- ELEC001 — Electricity Allocation
- INS001 — Insurance Allocation
- INTERNET001 — Internet Expense Allocation
Step 4 — Define Allocation Lines
Next, move to the Lines section of the Allocation Account.
Add the G/L accounts or applicable allocation destinations where the expense should be distributed.
For each allocation line, define the relevant information, such as:
- G/L Account No.
- Description
- Department
- Dimension
- Other applicable accounting dimensions
The exact fields available can vary depending on your Business Central configuration.
Example
For a shared office rent expense, the allocation lines could represent:
DepartmentAllocation
- Administration40%
- Sales35%
- Finance25%
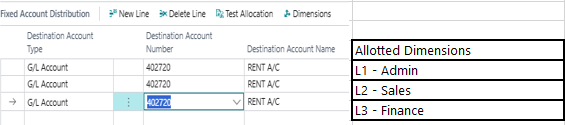
This establishes how the expense should be distributed when the allocation is used.
Step 5 — Assign Distribution Percentages
Enter the appropriate allocation percentage for each line.
For example:
DepartmentPercentage
- Administration40%
- Sales35%
- Finance25%
- Total100%

The allocation should add up to the required total based on the allocation method and configuration being used.
For a percentage-based allocation, the total should be 100%.
Why Is This Important?
The percentages determine how the original expense amount is distributed.
For example, if the original expense is ₹100,000:
Administration:
₹100,000 × 40% = ₹40,000
Sales:
₹100,000 × 35% = ₹35,000
Finance:
₹100,000 × 25% = ₹25,000
This removes the need for accountants to manually calculate each department's share every time the recurring expense is posted.
Step 6 — Validate the Allocation Setup
Before saving the Allocation Account, review the complete configuration.
Allocation Account Validation Checklist
Check that:
- Allocation Account Code is correct
- Description is clear
- Relevant G/L accounts are selected
- Departments or dimensions are correct
- Allocation percentages are entered correctly
- Percentage-based allocation totals 100%
- The allocation reflects the organization's accounting policy

Testing the allocation with a sample transaction before using it for live postings is also recommended.
Step 7 — Save the Allocation Account
After reviewing the configuration, save the Allocation Account.
The allocation setup is now available for use according to your Business Central configuration and posting process.
For recurring expenses, this can help finance teams avoid recreating the same allocation logic manually each month.
Example: Allocating a ₹100,000 Office Rent Expense
Let's look at a simple example.
Your company receives an office rent invoice of:
Total Expense = ₹100,000
The organization has agreed to allocate the rent as follows:
| Department |
Percentage |
Allocated Amount |
| Administration |
40% |
₹40,000 |
| Sales |
35% |
₹35,000 |
| Finance |
25% |
₹25,000 |
| Total |
100% |
₹100,000 |
Without an allocation setup, the accountant may need to manually calculate and enter these values.
With a predefined allocation structure, the distribution logic is established in advance.

This makes recurring expense allocation more consistent, repeatable, and less dependent on manual calculations.
Benefits of Using Allocation Accounts in Business Central
Using a structured allocation process can provide several benefits to finance and accounting teams.
Instead of calculating and entering multiple allocation lines every month, predefined allocation rules can be reused.
- Improve Posting Consistency
Standardized allocation rules help ensure that recurring shared expenses are distributed consistently.
- Reduce Calculation Errors
Predefined percentages reduce the risk of manual calculation mistakes.
- Simplify Month-End Closing
Automating repetitive allocation activities can help finance teams spend less time on manual journal preparation during month-end.
- Improve Department-Level Visibility
Allocating shared expenses to the appropriate departments or dimensions can provide management with a clearer view of departmental costs.
- Standardize Recurring Expenses
Expenses such as rent, electricity, insurance, and internet can follow a consistent allocation methodology instead of being recalculated from scratch every month.
- Allocation Account Validation Checklist
Before using an Allocation Account in a production environment, verify the following:
| Check |
Validation |
| Allocation Code |
Unique and easy to identify |
| Description |
Clearly explains the purpose |
| G/L Accounts |
Correct accounts selected |
| Departments / Dimensions |
Correct destinations assigned |
| Allocation Percentage |
Correct percentage entered |
| Total Allocation |
100% for percentage-based allocation |
| Sample Transaction |
Test posting completed successfully |
| Accounting Policy |
Allocation methodology approved internally |
A sample transaction should be tested before the allocation is used for recurring live transactions.
Frequently Asked Questions About Allocation Accounts in Business Central
What are Allocation Accounts in Business Central?
Allocation Accounts in Microsoft Dynamics 365 Business Central are used to define how amounts can be distributed across multiple accounting destinations using predefined allocation rules.
How do I create an Allocation Account in Business Central?
Use Alt + Q to open the Tell Me search, search for Allocation Accounts, open the Allocation Accounts page, select New, and then define the allocation account details, lines, and distribution rules.
Can Allocation Accounts distribute expenses by department?
Yes. Allocation setups can be used with relevant dimensions such as departments or cost centres, depending on the organization's Business Central configuration. This can help distribute shared expenses across different business areas.
Can Allocation Accounts use percentages?
Yes. A percentage-based allocation can distribute an expense according to predefined proportions. For example, a ₹100,000 expense could be allocated 40% to Administration, 35% to Sales, and 25% to Finance.
What happens if allocation percentages do not total 100%?
For a percentage-based allocation, the allocation should be configured to represent the complete amount being distributed. If the percentages do not total 100%, review the setup before posting to avoid an incomplete or incorrect allocation.
What types of expenses can be allocated using Business Central?
Common shared expenses include office rent, electricity, internet and communication, insurance, maintenance, facility costs, and other recurring expenses that need to be distributed across departments, locations, cost centres, or other dimensions.
Final Takeaway
Stop manually splitting the same expenses every month.
With Allocation Accounts in Microsoft Dynamics 365 Business Central, businesses can establish predefined allocation rules and use them to create a more consistent approach to distributing shared expenses.
The basic process is:
Create Allocation Account → Define Allocation Lines → Assign Distribution Rules → Validate → Use in Transaction Posting
For finance teams dealing with recurring shared expenses, this approach can help reduce manual calculations, improve consistency, simplify month-end activities, and provide better visibility into departmental costs.
If your organization is looking to streamline accounting processes and get more value from Microsoft Dynamics 365 Business Central, structured expense allocation is one area worth reviewing as part of your finance automation strategy.