Learn how to configure IP restriction with Multi-Factor Authentication (MFA) in Microsoft Entra Admin Center without using P1 or P2 licenses. This step-by-step guide helps organizations secure user login access based on Office IP addresses while enforcing OTP verification for external access.
H2: Why Configure IP Restriction with MFA in Microsoft Entra ID?
Configuring IP restriction with MFA in Microsoft Entra Admin Center helps organizations improve login security by allowing seamless access from trusted Office networks while requiring OTP verification for users accessing the system externally.
This setup is useful for businesses looking to:
- Secure remote access
- Restrict unauthorized login attempts
- Implement Office IP-based authentication
- Enable MFA without purchasing P1 or P2 licenses
- Strengthen Microsoft identity security
Prerequisites Before Configuring MFA and Trusted IPs
Before starting the configuration, ensure that:
- You have Admin access to the Microsoft Entra Admin Center
- Users have valid mobile numbers
- Office public IP addresses are available
- Per-User MFA is enabled in your tenant
- SMS authentication method is enabled
Step-by-Step Guide to Configure IP Restriction with MFA
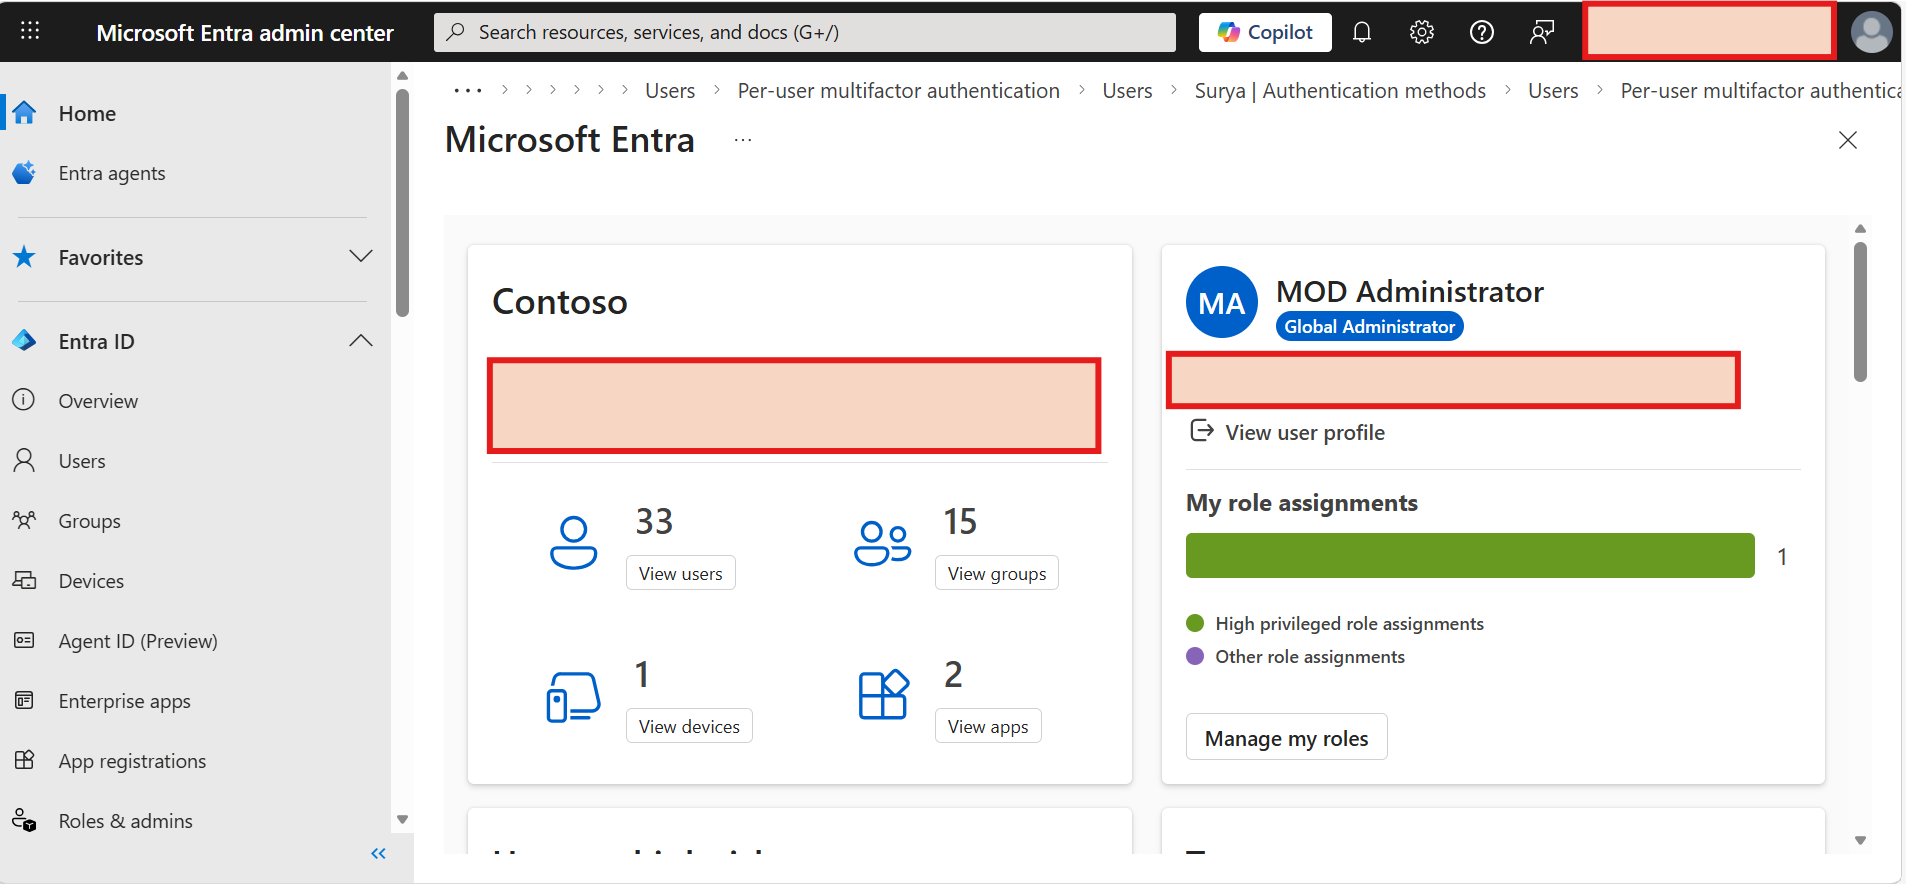
Step 1 – Login to Microsoft Entra Admin Center
Log in to the Microsoft Entra Admin Center using an Admin account.
Step 2 – Configure Authentication Methods
- Go to Authentication Methods
- Ensure that only one SMS Authentication method policy is enabled for all users
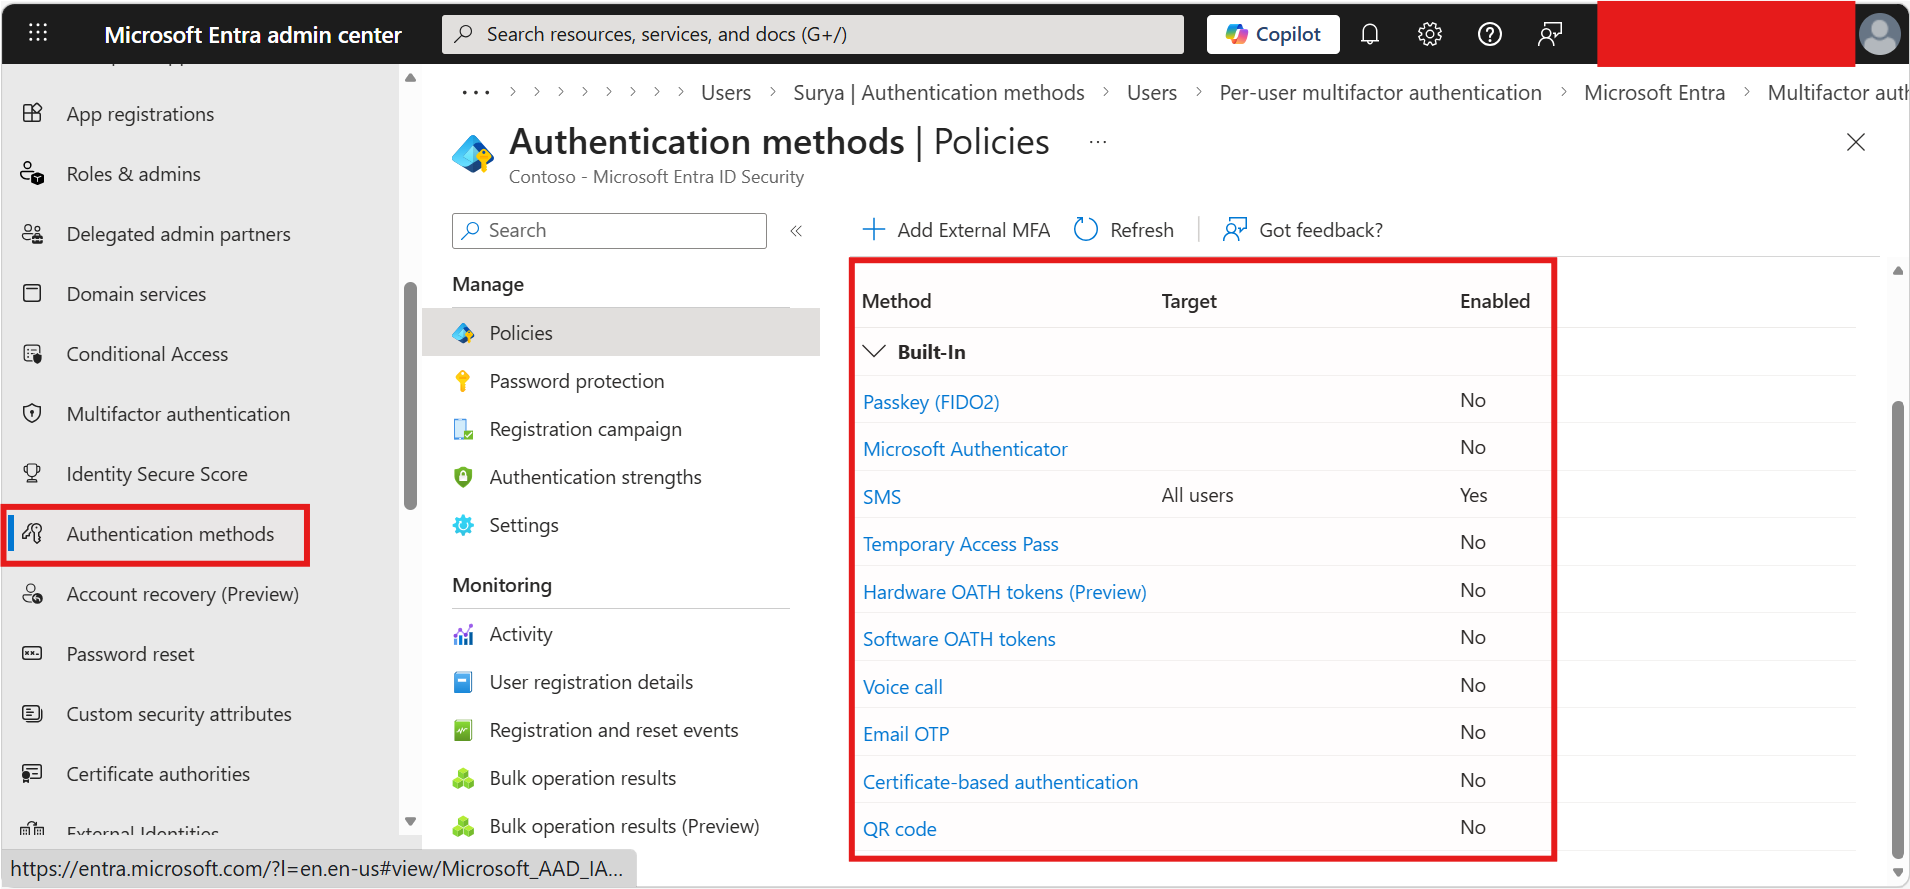
This setup is required for proper MFA authentication and OTP verification.
Step 3 – Disable System-Preferred MFA
- Under Authentication Methods, go to Settings
- Make sure that System-preferred multifactor authentication is disabled
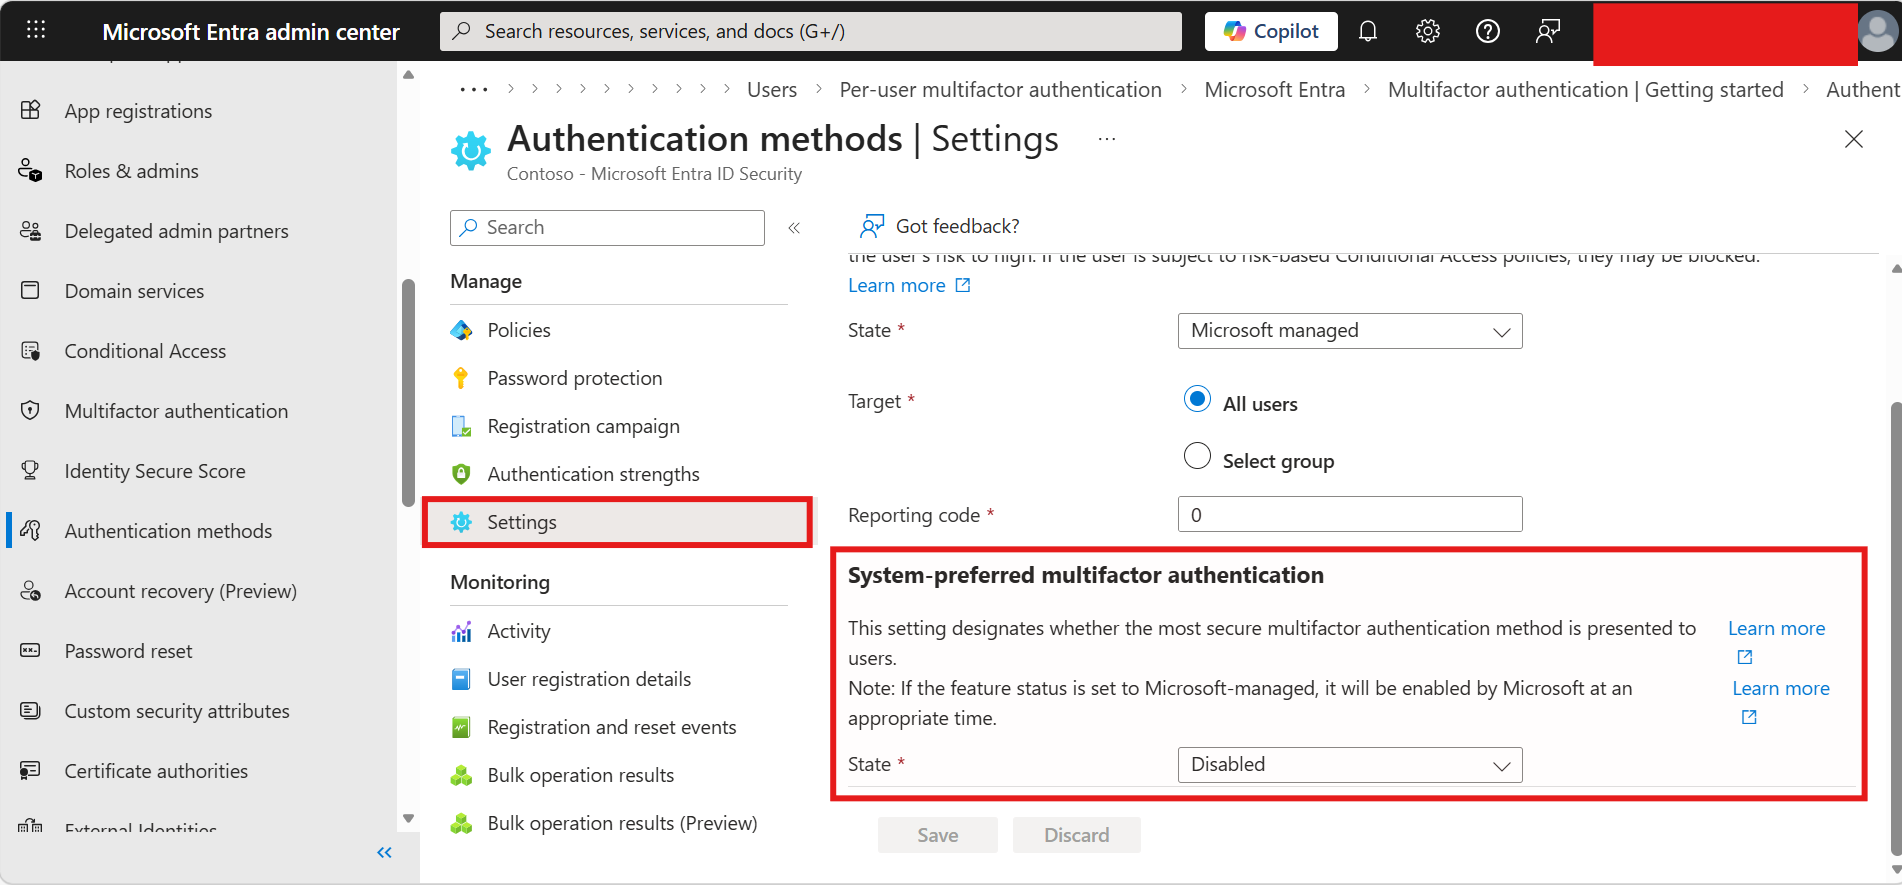
Disabling this setting ensures the configured SMS authentication method is consistently used.
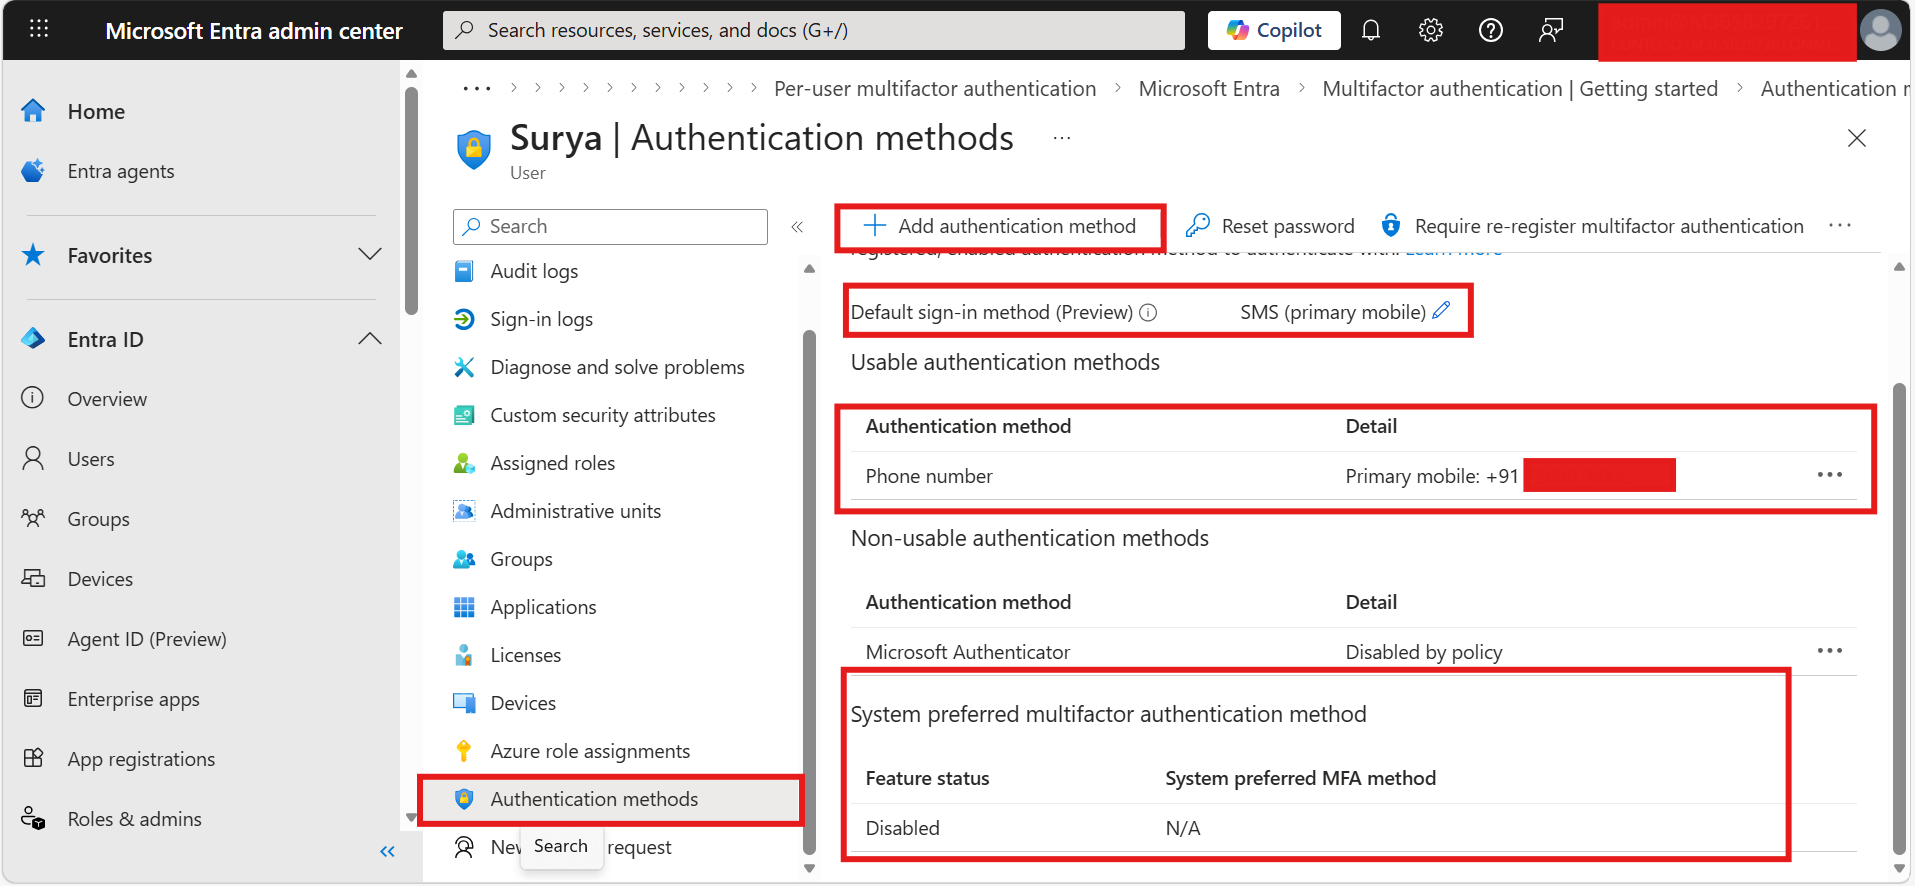
Step 4 – Configure User Authentication Method
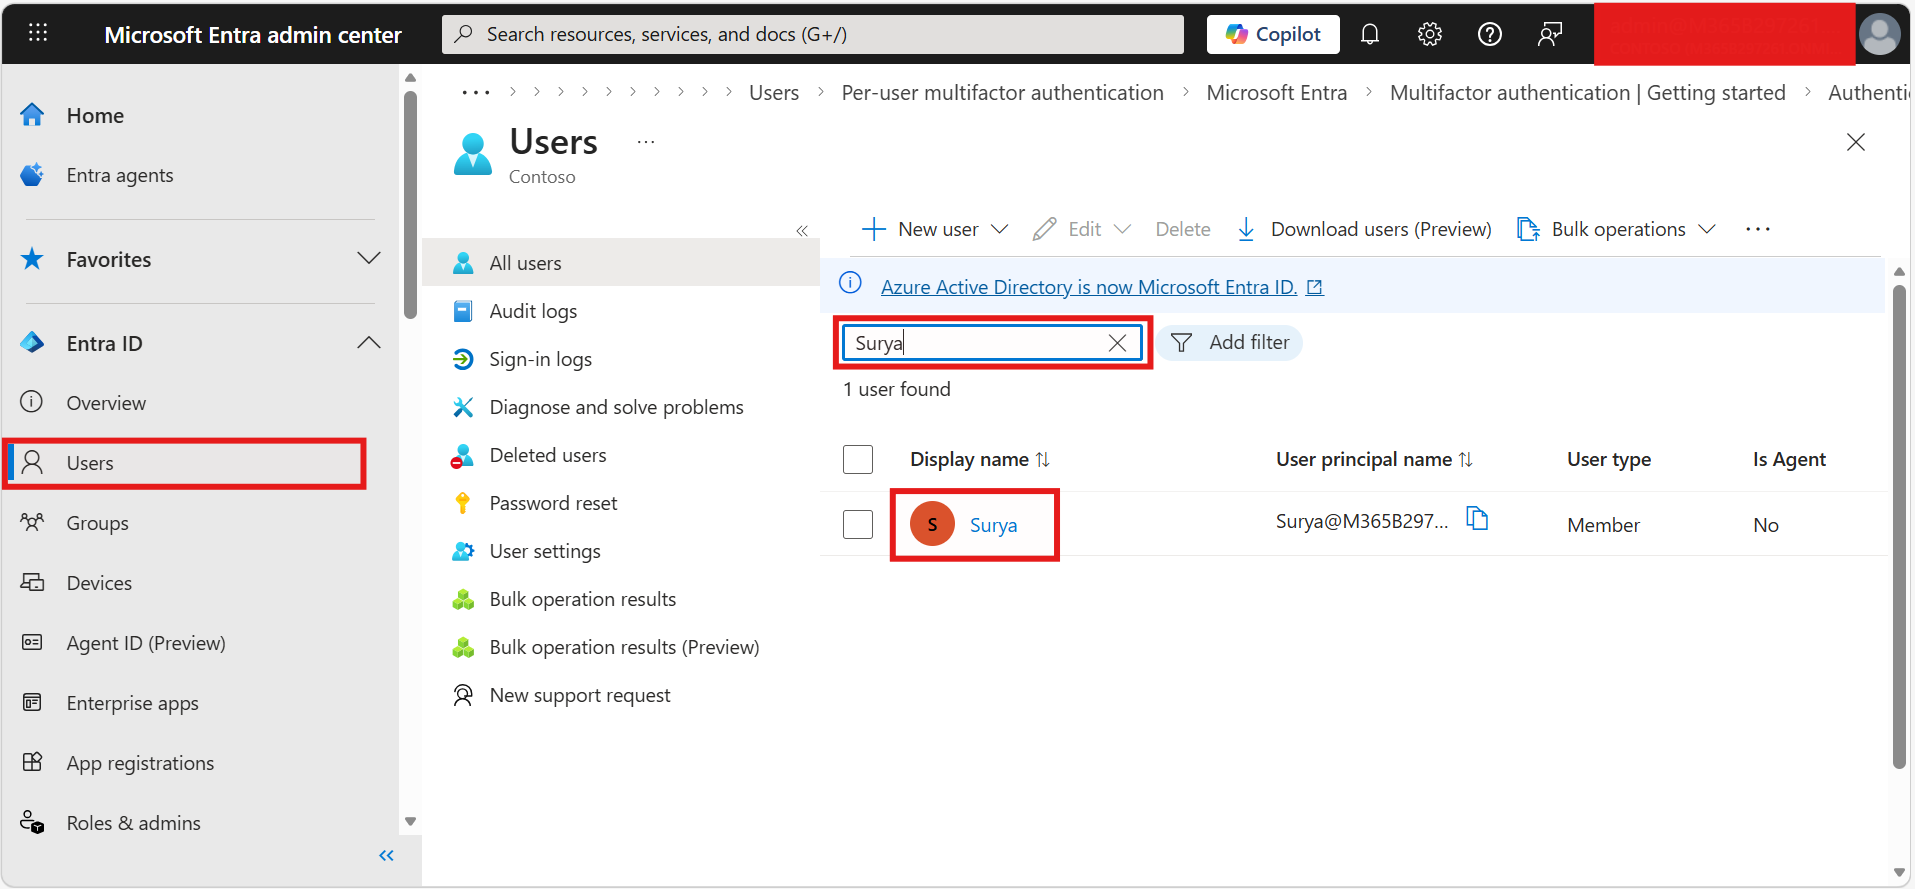
- Go to Users
- Search for the required user by User Name
- Click on the Display Name to open the user profile
- Navigate to Authentication Methods under the selected user
- Ensure that System-preferred multifactor authentication method is disabled
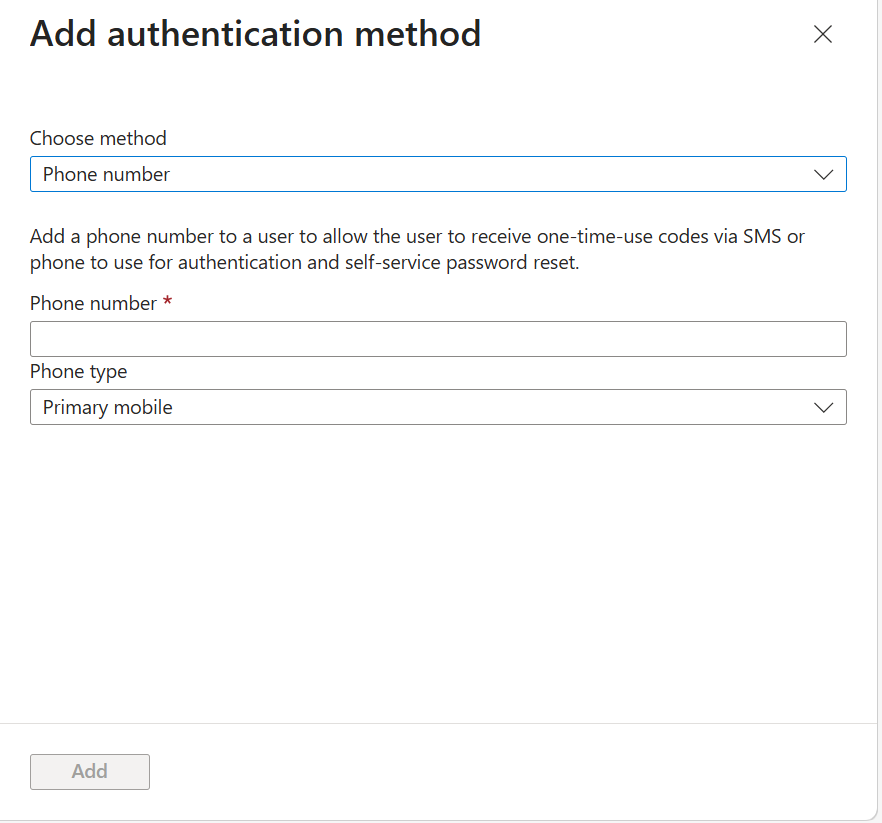
- Click on Add Authentication Method
- Select Phone Number as the method
- Enter the phone number in the following format: +91 1234567891
- Set the Phone Type as Primary Mobile
Important Configuration Checks
Make sure that:
- The added phone number is visible under Authentication Methods
- The Default sign-in method (Preview) is set to SMS (Primary Mobile)
This is an important setup for secure MFA verification.
Step 5 – Restrict Access Outside the Office
To restrict users from accessing the system outside the office:
- Define the mobile number of the Head of Department, Manager, or responsible person instead of the end user (if required by your internal process)
This helps organizations maintain centralized OTP approval and controlled user access.
Step 6 – Configure Per-User MFA and Trusted IPs
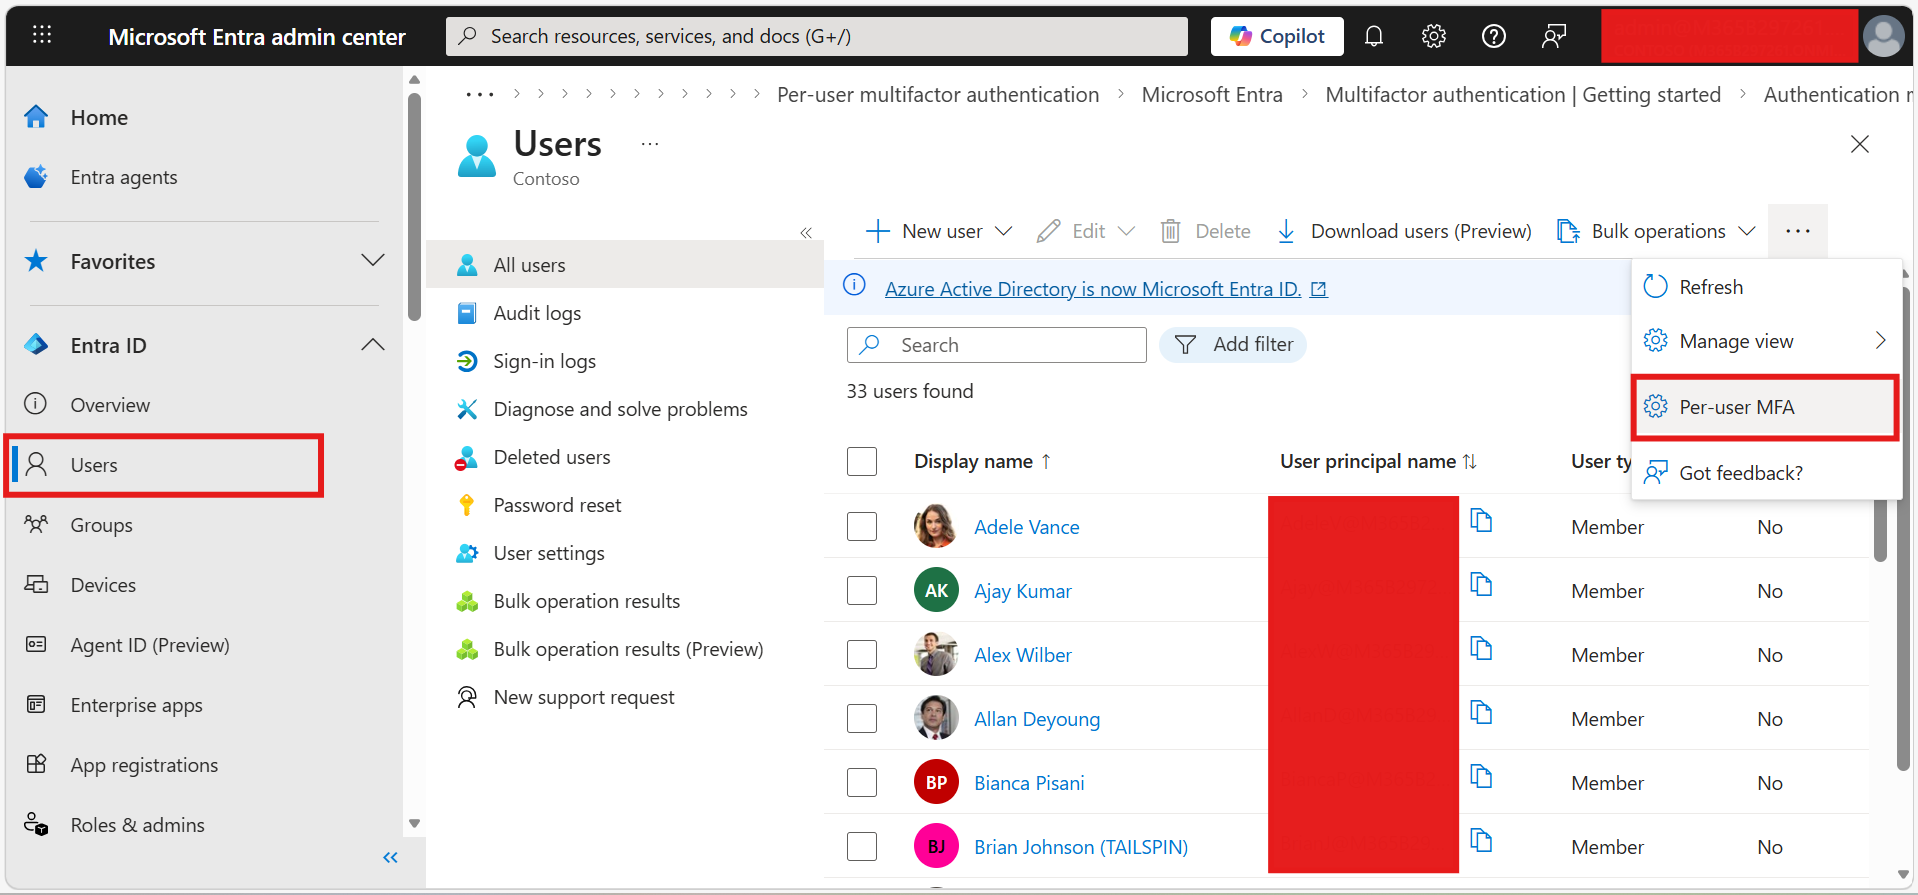
- Go to Users
- On the right side, click on the three dots (More options)
- Select Per-User MFA
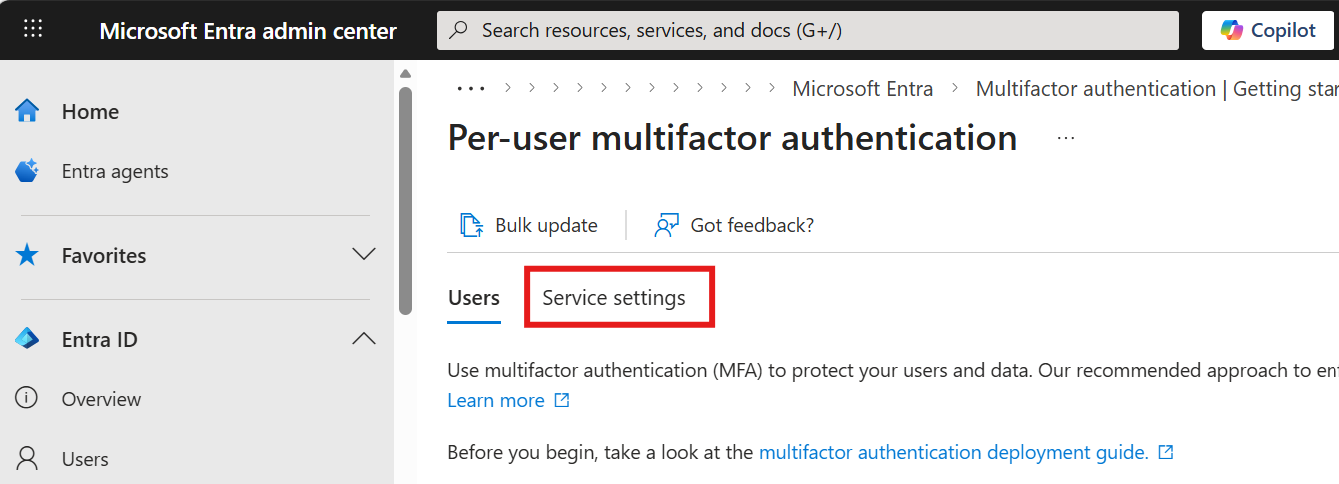
- Go to Service Settings
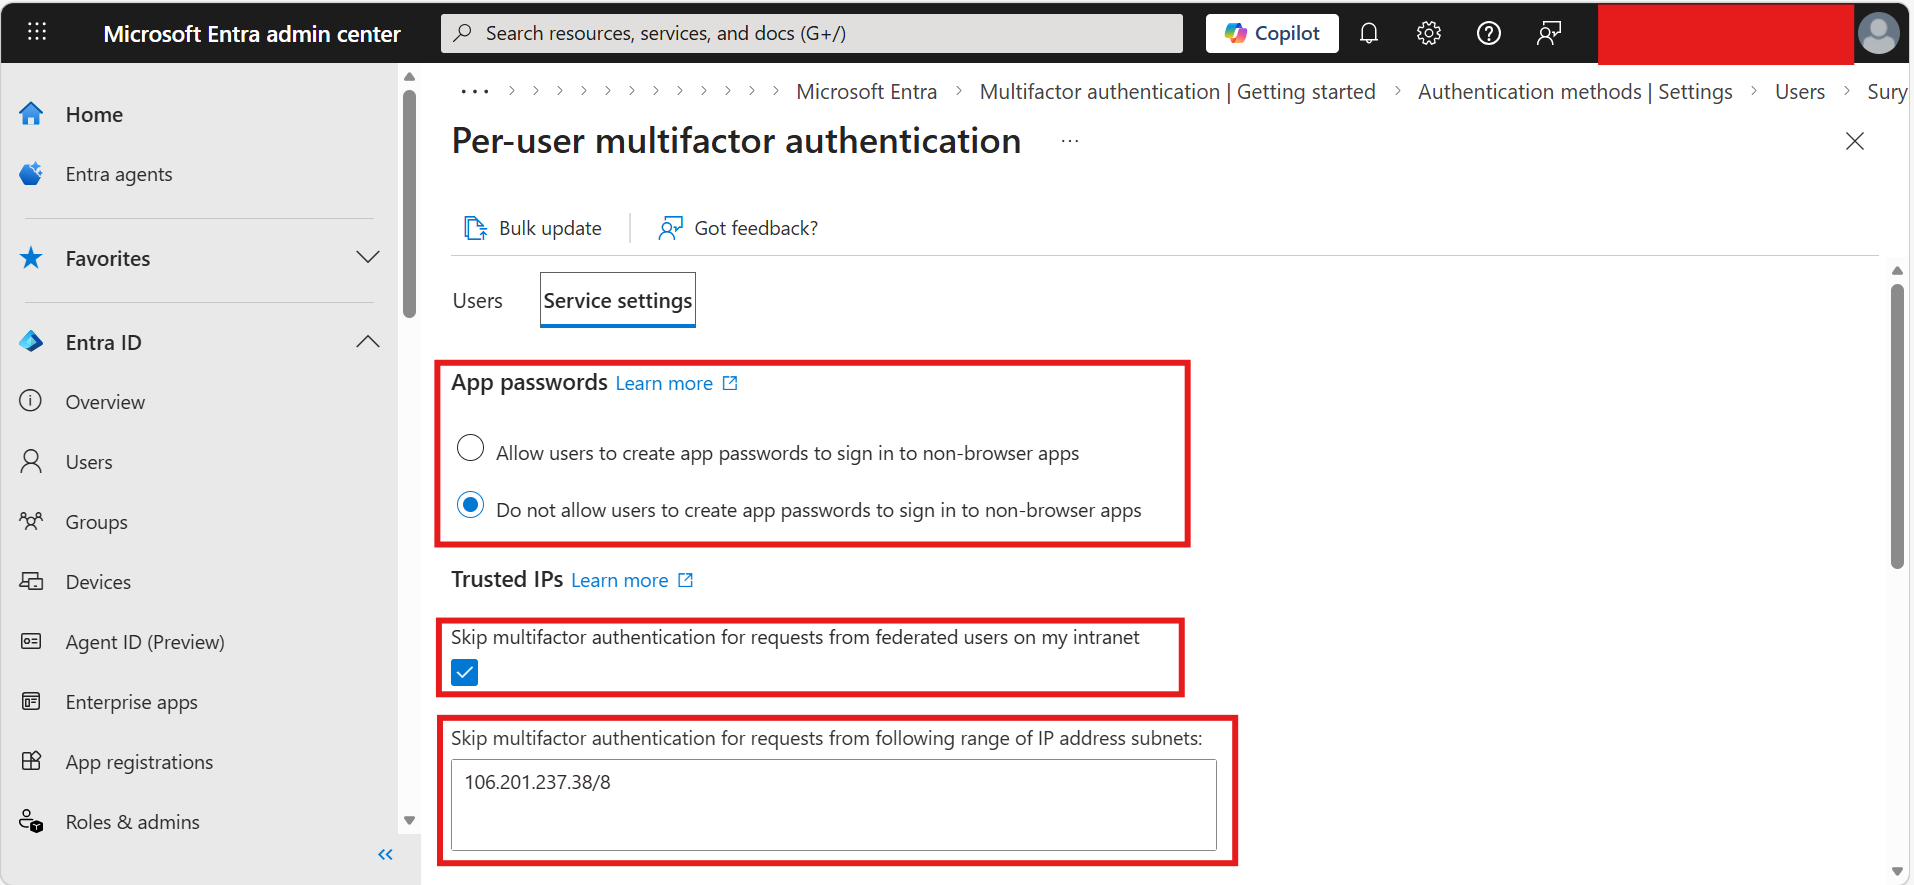
H4: Configure App Password Settings
Under App Passwords, select:
- Do not allow users to create app passwords to sign in to non-browser apps
Configure Trusted IP Addresses
Under Trusted IPs:
Enable:
- Skip multifactor authentication for requests from federated users on my intranet
Enter the IPv4 address in the following format: 000.000.000.00/8
Under:
- Skip multifactor authentication for requests from the following range of IP address subnets
Enter: 000.000.000.00/8
Multiple Office IP Addresses
For multiple IP addresses:
- Add each additional IP address on a new line
This configuration allows users to access the system without OTP verification when connected from trusted Office network IP addresses.
Step 7 – Remember MFA on Trusted Devices
Enable:
- Allow users to remember multifactor authentication on devices they trust (between 1 to 365 days)
Set:
- Number of days users can trust devices for between 1 and 365 days
Recommended Setting
It is recommended to set this to: 1 Day
This setting helps restrict users from using external devices for long periods without re-authentication, improving organizational security.
H3: Step 8 – Save All Configuration Changes
- Save all the changes made in the configuration
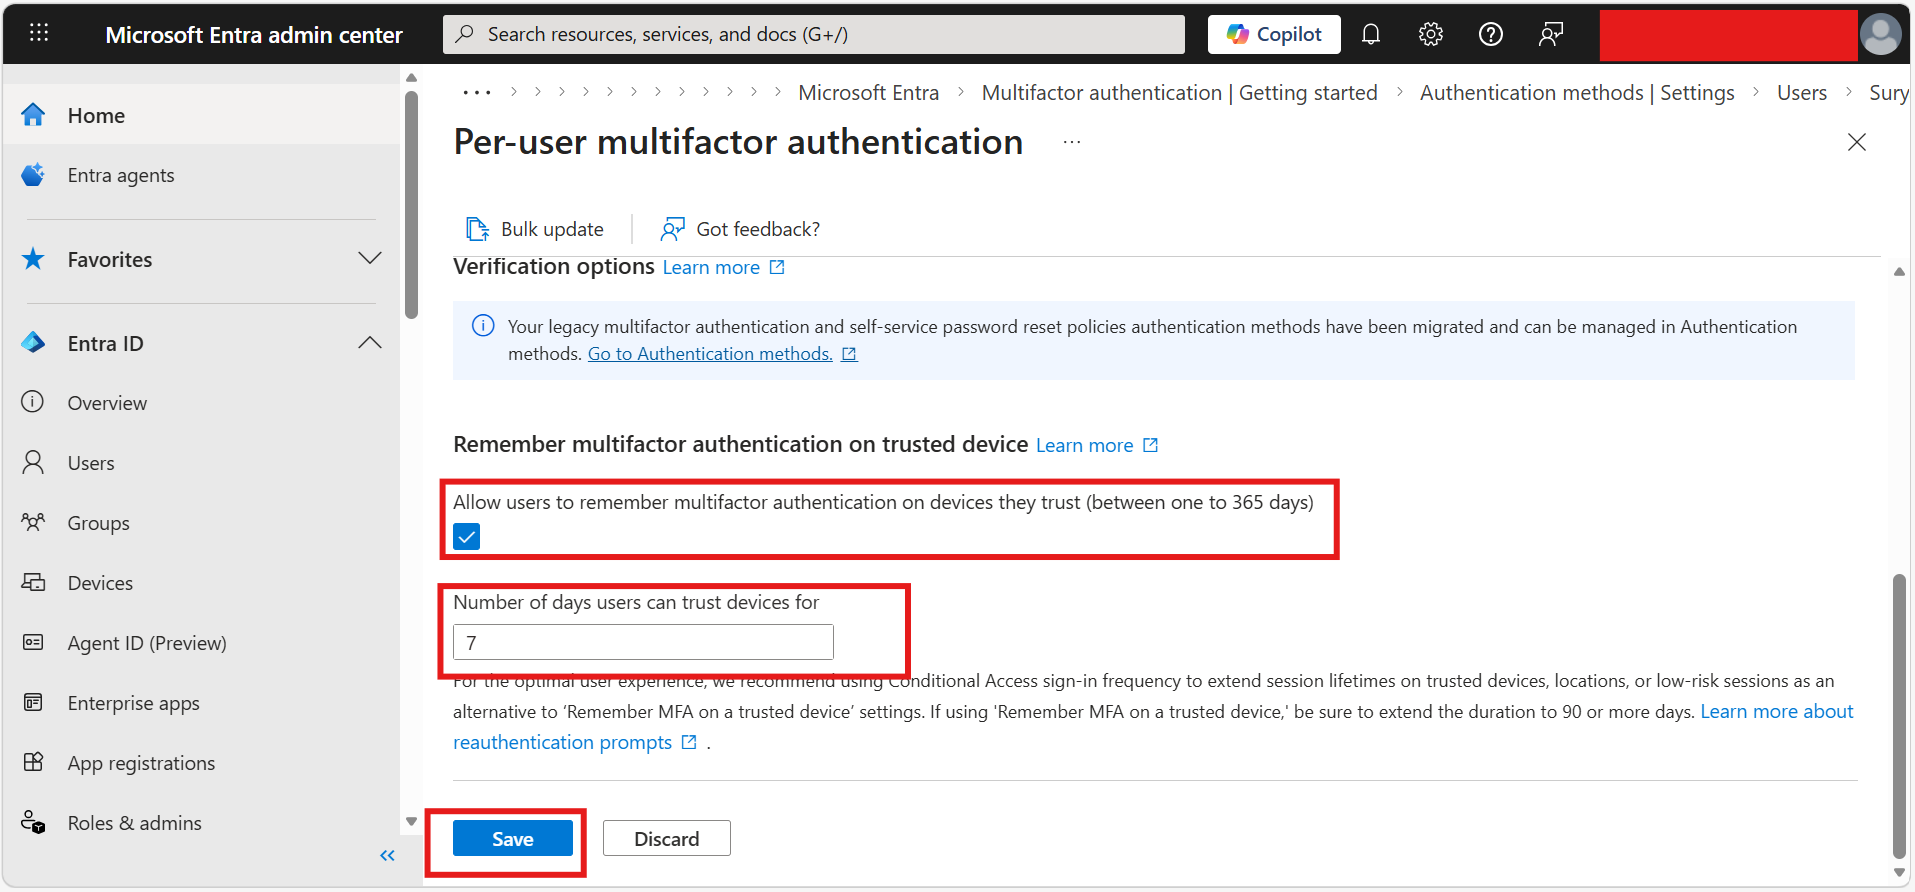
Ensure that all MFA, Trusted IP, and Authentication Method settings are properly updated before proceeding.
Step 9 – Enable MFA for the User
- Return to the Users page
- Search for the user name in the search bar
- Select the user
- Enable MFA for that user
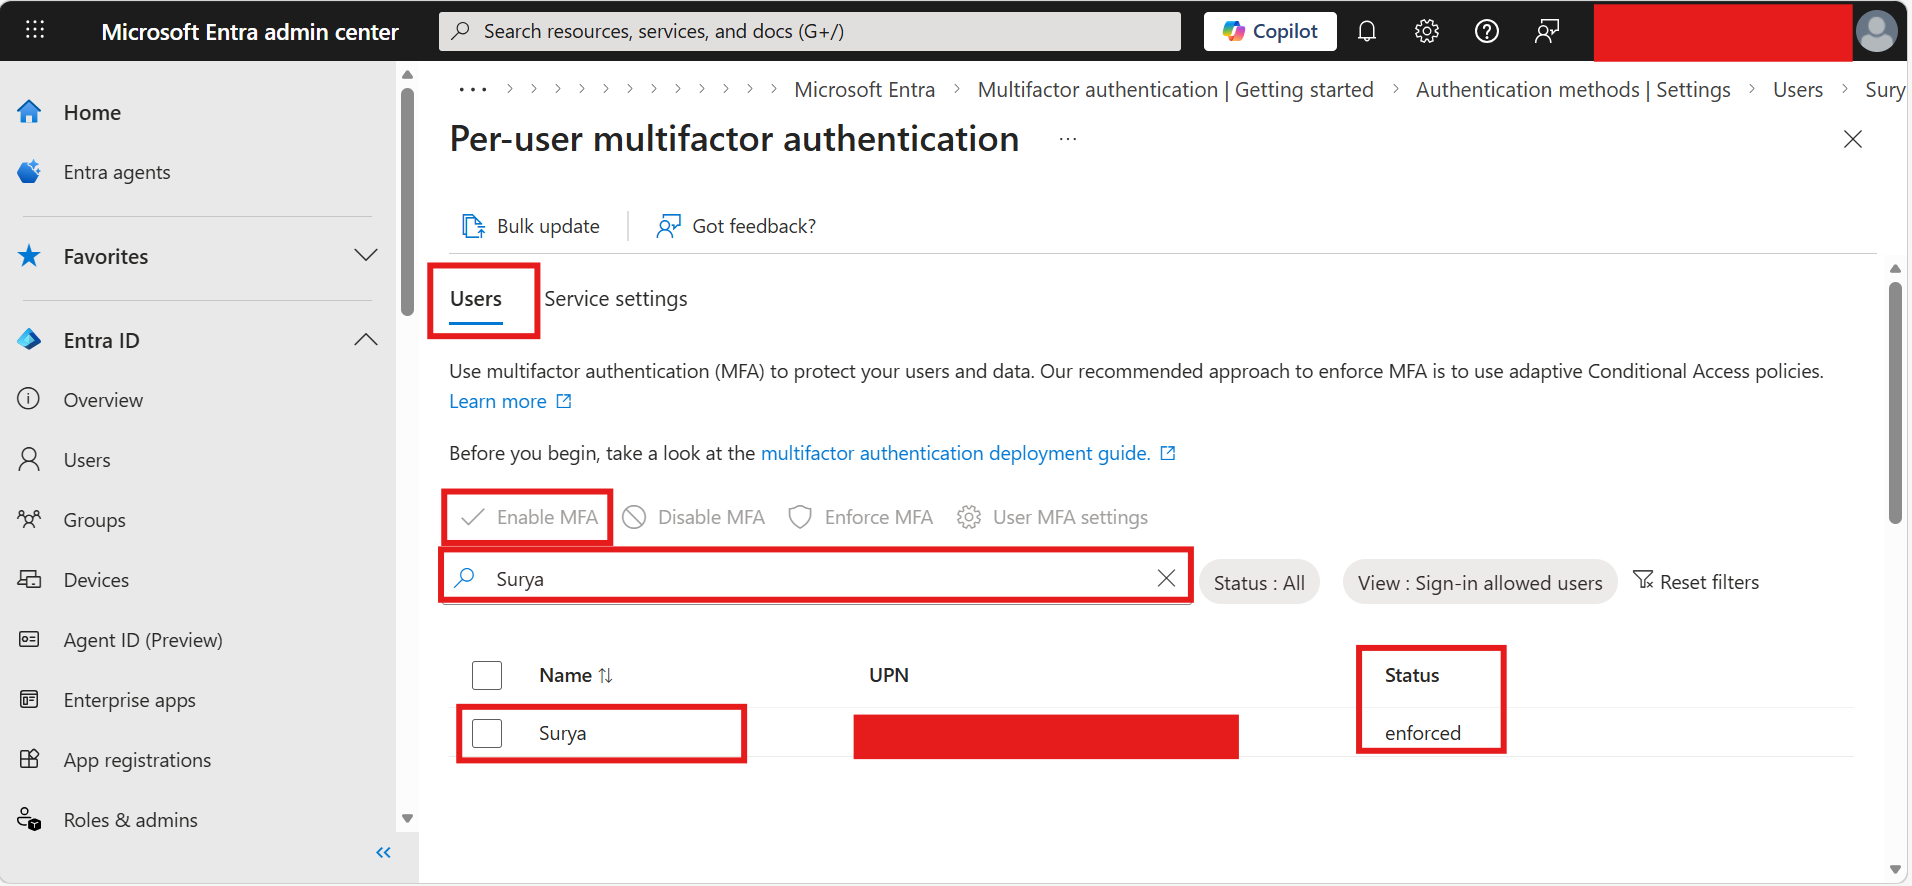
This completes the MFA and IP restriction configuration process.
How This MFA and IP Restriction Setup Works
After completing the configuration in Microsoft Entra Admin Center:
- If the user logs in from the Office IP address, SMS verification will not be required
- If the user logs in from outside the Office IP address, OTP verification will be required
- The OTP will be sent to the designated responsible person’s mobile number as configured in the system
This setup helps organizations implement secure IP-based login restriction without advanced licensing.
Benefits of Configuring MFA with Trusted IPs
Implementing Trusted IPs with MFA offers several advantages:
- Improved login security
- Reduced unauthorized access
- Better control over remote logins
- Simplified Office network authentication
- Secure OTP-based external access
- MFA implementation without additional P1 or P2 licensing cost
Frequently Asked Questions (FAQs)
Can I configure MFA with IP restriction without a P1 or P2 license in Microsoft Entra ID?
Yes, you can configure MFA with Trusted IP restrictions using Per-User MFA settings in Microsoft Entra Admin Center without requiring P1 or P2 licenses.
2. What happens when a user logs in from outside the Office IP address?
If a user logs in from outside the configured trusted Office IP address, the system will trigger OTP verification through SMS-based Multi-Factor Authentication (MFA).
3. How do Trusted IPs work in Microsoft Entra MFA?
Trusted IPs allow organizations to bypass MFA verification for users accessing the system from approved Office network IP addresses while enforcing MFA for external logins.
4. Why should System-Preferred MFA be disabled?
Disabling System-Preferred MFA ensures that the configured SMS authentication method is consistently used for login verification and access control.
5. Can I use a manager’s mobile number for OTP verification instead of the user’s number?
Yes, organizations can configure the mobile number of a Manager, Head of Department, or responsible person to receive OTP verification messages based on internal security policies and access control requirements.
Conclusion
Configuring IP restriction with MFA in Microsoft Entra Admin Center without P1 or P2 licenses is an effective way to strengthen organizational security while controlling user access based on Office network IP addresses.
By implementing Trusted IPs, SMS authentication, and Per-User MFA settings, businesses can secure remote access, reduce unauthorized login attempts, and maintain better authentication control without additional licensing costs.